

Posted on June 05 2018


This tutorial contains everything you need to know about creating your own, printed clear acrylic charms.
If you are more of a visual learner, your may find our visual set up guide more useful. Click here to view our visual guide on issuu.com.
1. Download our templates
To start submitting your custom printed acrylic charm designs you’ll need to download our design templates. Templates are available in various sizes ranging from 0.5" (12.7mm) right up to 3.5" (88.9mm).
Download our Photoshop templates >> here << and open your chosen size.
![]()
Each template comes with a working area where you will import or create your designs. Please make sure that your artwork fits INSIDE of the blue borders.
2. Understanding our layers
Opening the template, you will notice that there are 8 layers in your Layers palette. If you can't see the Layers palette, hit F7 to make it appear.

IMPORTANT - Please don't rename existing layers or create additional layers as this will confuse our systems when processing your designs.
If you have used any effects / layer styles on any of your layers you MUST flatten them before saving. To do this simply right click on the applicable layer and select 'Rasterize Layer Style' from the menu.
'Office Use Only' Layer
This layer contains the blue borders which your design must sit inside, our logo and a brief description of the template size that you are using. DO NOT USE THIS LAYER.
'Artwork A' Layer
We print your designs in reverse onto the 'back' of our clear acrylic, before adding a layer of white ink. When you turn your printed charm over and view it through the front of the acrylic, your design appears the correct way around.
ALL ARTWORK ON THIS LAYER SHOULD BE FLIPPED SO THAT IT IS A MIRROR IMAGE OF ITSELF.
'Artwork B' Layer
We print the 'Artwork B' layer directly on top of the 'Artwork A' layer to create a double sided charm.
DO NOT FLIP/MIRROR THE ARTWORK ON THIS LAYER.
'White' Layer
Adding a base layer of white to your charms will make your colours crisper and more vivid. Any printed areas without a white base layer will appear transparent.
'Gloss Varnish' Layer
If you would like your charms to have a gloss finish as opposed to a matte finish, you can use this layer to show us where you would like the your areas of gloss to be placed.
‘Cut Area’ Layer
Use this layer to show us where you would like your charms to be cut. We'll use this information to create a path which will then be used to create a cut line for our laser cutters.
Please note that we do not print right up to the edge on any of our acrylic charms. It is therefore ESSENTIAL that you create a border of AT LEAST 1mm between your artwork and your cutline.
Failure to leave a 1mm border on your acrylic charm designs can result in damage and lifting along the printed edge of your charms as a result of the heat generated by the laser. See step 5a for more info.
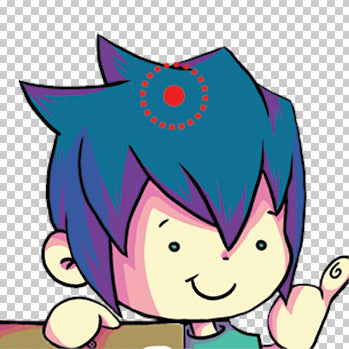
'Hole Template' Layer
Drag and drop the hole template onto your artwork to show us where you would like your hole to be placed. The dotted red line represents the recommended distance that your hole should be placed INSIDE of your design.

'Loop Template' Layer
Drag and drop our loop template onto your artwork to show us where you would like your loop to be placed. The light red, outer circle represents the loop size and the dark red inner circle represents the hole within the loop.

3. Importing your designs
Select the 'Artwork A' or 'Artwork B' layer and draw your designs directly onto these layers or, copy (CTRL+C) and paste (CTRL+V) previously saved artwork.
'Artwork A'
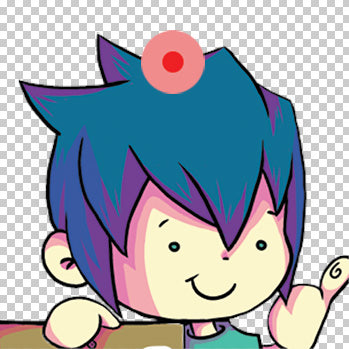
Create or paste the artwork that you would like to appear on the 'front' of your charm here. Once you are happy with your design FLIP IT so that it is a mirror image of itself.
![]()
We will print this onto the 'back' of the clear acrylic before adding a layer of white.
Your design will then be visible, the correct way around, via the 'front' of the acrylic.
'Artwork B'
This is where you will create or paste the artwork that you would like to appear on the 'back' of your charms for our 'B-Side' printing option. DO NOT FLIP THIS LAYER!
![]()
We print your B-Side ('back') design directly on top of the A-Side ('front') design to create an awesome looking double sided charm.
4. Check your Alignment
If you're producing double sided charms it's important that your A-Side and B-Side artwork lines up correctly.
A simple way of checking this is to select your 'Artwork B' layer and lower the opacity to 50%
Now view your artwork and check that both A & B are the same size and nicely aligned. Here is an example of how it should look...

5a. Adding a layer of white
To guarantee bright and crisp colours for your artwork, you will need to add a white base layer to your designs. This white layer will sit behind your artwork and will ensure that the colours of your charms are consistent, regardless of what material you choose.
Check out the charms below by jwhitneyart.com. Using a white base layer of ink means their designs look the same on our white and black acrylics.

Please note that we ask that you create this white layer for ALL of your charm designs, even white acrylic charms.
An additional benefit of creating your own white base layer is that you can let us know EXACTLY where you would like us to print your white areas. This allows customers to add additional features to their designs, such as transparencies (see 5c), as well as reducing any areas of white creeping around the edges of your artwork.
To create your white base layer simply hold down the 'CTRL' key and click on the thumbnail of your 'Artwork' layer. This will select all of the elements of your artwork layer.

Inset your selection by 2 pixels using SELECT > MODIFY > CONTRACT and enter the value of 2 in the pop up 'Contract Selection' window.
Insetting your white layer by 2 pixels will prevent any areas of white from showing around the printed edge of your charms.
Now go to EDIT > FILL (Shift & F5) and select the 'Color' option from the 'Content' drop down menu.
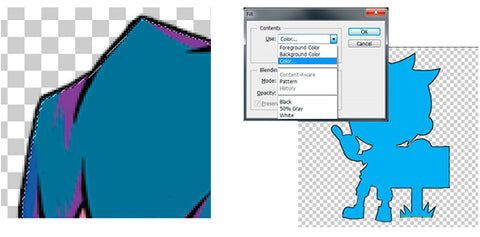
Choose 100% Cyan as your colour (C:100 M:0 Y:0 K:0)
Click 'OK' and 'OK' again. You should now have a Cyan silhouette of your original artwork, placed on your 'White' layer.
Be aware that contracting your selection in this manner can have an effect on the pixels selected. Always zoom in on areas with fine details such as strands of hair or small point text and check that you are happy with the results.
You may decide to only contract your selection by 1 pixel if you have a lot of fine or intricate areas in your designs.
Please remember that we always recommend ordering samples before committing to large print runs, so that you can check that you are happy with the results. Mistakes can not be rectified once your charms have been printed.
5b. Identifying unwanted areas of coloured ink, white & varnish
Using soft brushes in Photoshop can result in unwanted, low opacity pixels causing issues around the edges of your artwork.
These pixels can be invisible to the eye but get picked up by our printers, which print ALL pixels on your white and gloss layers, no matter how low their opacity, as 100% white or 100% gloss. This can cause unwanted areas of white ink and gloss varnish around the edges of your finished charms.
A simple way to check your artwork for low opacity pixels is to click on your artwork layers, your white layer or your gloss layer, select the paint bucket tool and fill the background black.

The paint bucket will fill all areas of the background except where there are any low opacity pixels. These can then be easily identified and removed using the selection and eraser tools.
IMPORTANT - Please remember to undo the black paint bucket fill before submitting your designs.
5c. Transparencies
The 'White' layer can also be used to create areas where you don't want a white base. This effect works especially well on our clear acrylics to create transparencies (areas with coloured ink but no white ink or areas with no ink at all).
![]()
To create a transparent area, simply delete any unwanted areas on your white layer using the eraser or any of the other tools at your disposal in Photoshop to achieve your desired effect. You can see this effect on our clear acrylic charms above.
6a. Working with gloss varnish
You can choose to have a gloss or matte finish on your designs by selecting the matte or gloss option when placing your orders. If you choose 'Gloss' as your option, you will need to create a grey silhouette on the 'Gloss Varnish' layer, similar to how you created the cyan silhouette on your 'White' layer in step 5 of this tutorial.

Select the 'Gloss Varnish' layer in the layers palette. Copy your artwork from the 'Artwork' layer and paste it into the 'Gloss Varnish' layer using the 'Paste Special' command SHIFT + CTRL + V.
With the 'Gloss Varnish' layer selected, click on the 'Lock Transparent Pixels' icon.
![]()
Now go to EDIT > FILL (Shift & F5) and select the 'Color' option from the first drop down menu. Enter the following colour values to create a grey fill C:0 M:0 Y:0 K:50
Click 'OK' and 'OK' again. You should now have a grey silhouette of your original artwork, placed on the 'Gloss Varnish' layer.
6b. Spot gloss varnish
As well as being able to add gloss varnish to your entire design, you also have the option to limit this to certain areas, in effect highlighting particular elements of your design. Handy for creating textures like water droplets or snakeskin.
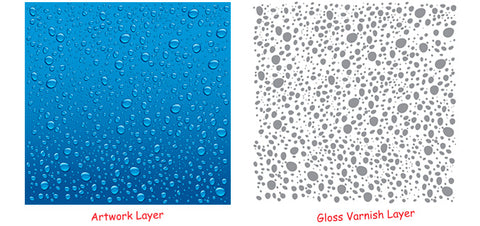
To do this, simply delete any unwanted parts of the grey silhouette that you created in step 6a. or create a custom silhouette based on the areas of your design that you would like to highlight.
7a. Adding a border / cut line - Important!
You can now decide on the thickness of your border, which will be used as a cut line. It is ESSENTIAL that you make this border AT LEAST 10px wider than your artwork. Failure to do so can cause your printed design to lift along the cut edge as a result of the heat generated by the laser. A 10px border will prevent this from happening.
To do this go to SELECT > MODIFY > EXPAND and enter your chosen width. You will see that your selected area has grown by the amount of pixels you chose.

Use the 'Fill' command (SHIFT+F5) or EDIT > FILL and fill this area black. This colour will not be printed, it's simply for our designers to use as a guide when creating your cut line.
TIP - Use the paintbrush to cover any areas missed by the 'fill' command!
7b. Adding a hole
Drag and drop the hole template into position on your design to show us where you would like a hole placing.
The solid inner circle represents the hole and the dotted outer circle represents the recommended distance that your hole should be placed INSIDE of your design.
Please don't merge the hole template with your design as we will need to remove this before printing so that it's not visible on your finished charms.
7c. Adding a loop
If you would prefer a loop instead of a hole drag and drop the loop template into position on your design to show us where you would like a loop placing.
The light red outer circle represents the loop size and the dark red inner circle represents the hole within the loop.
Please don't merge the loop template with your design as we’ll need to remove this before printing so that it's not visible on your finished charms.
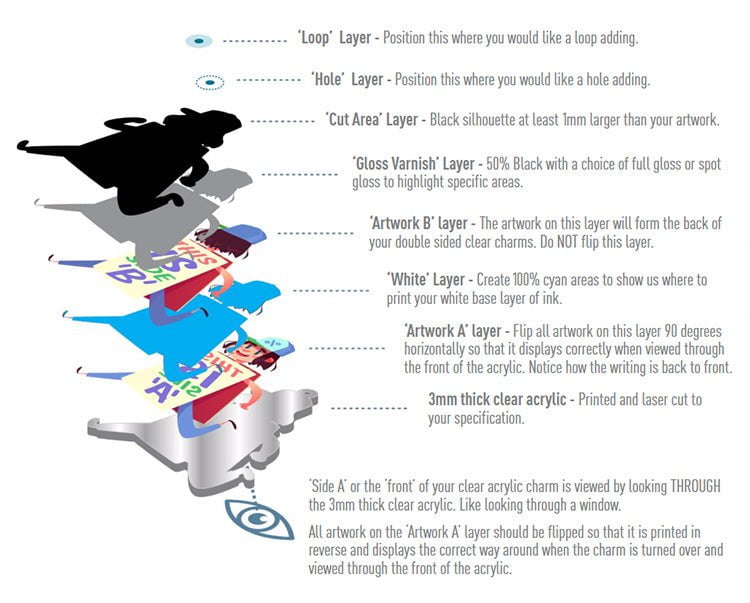
8. Visual Guide
Here's an exploded view of our clear acrylic charms, showing how each layer sits together to make your custom charm designs. You can view the full visual set up guide here.
9. Submission checklist
Congratulations, you've finished creating your custom charm designs! All you have to do now is check the following before submission...
- Your artwork fits INSIDE of the blue borders.
- Your white base layer is 100% Cyan and located on the 'White' Layer (Step 5a.)
- Your gloss varnish layer is 50% Black and located on the 'Gloss Varnish' layer (Step 6a.)
- You have checked for unwanted elements using the steps at 5b.
- The hole and loop layers have NOT been grouped or merged with the rest of your design.
- Your border is AT LEAST 1mm (10px) thick.
- All text has been converted to outlines.
- Your charm template contains 1 charm only. Additional charms will be sent separately.
10. Saving and submitting your designs
There are 3 different ways to save and submit your designs...
1. Submit your artwork immediately
If you have already created your designs, you can send them to us using the 'Upload Artwork' button, located on our product pages or by emailing them to ‘info@zapcreatives.com’.
Save all Photoshop files in .Psd format. Here’s how…
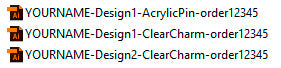
Name each of your designs appropriately so that we know which designs you are referring to. Your file names should include 1. your name, 2. design number, 3. chosen product and 4. the date that you placed your order through our website. Here’s an example…

Select all of the designs that you would like to submit, right click and choose SEND TO > COMPRESSED (ZIPPED) FOLDER.

This will create a compressed folder containing all of your designs. Rename this folder so that it contains your name and the date that you placed your order on our website. Like this…

Please add all of your designs into one folder. So, if you purchased charms, stickers and pins, for example, just pop them all in the same, compressed folder and upload it using the 'Upload Artwork' button.
2. Submit your artwork later
If you have placed your order via our website but your designs aren’t quite ready yet, that’s ok. You have up to 2 weeks to submit your artwork to us, which allows you to take advantage of any special offers that we’re running.
To submit your designs later, save them with 1. your name, 2. design number, 3. chosen product and 4. your order number. Then email them to ‘info@zapcreatives.com’.
Save all Photoshop files in .Psd format. Here’s how…
3. Placing a re-order
If you have placed an order in the past and would like to re-order those designs that’s great! We store your artwork for a maximum of 6 months, which saves you the hassle of having to resubmit your designs via email.
To place a re-order, simply place your order online, email us with your previous order number(s) and let us know that you are placing a re-order.
You may only want to order 1 or 2 designs from your previous order(s). To do this simply quote your old file name(s) and let us know how you would like them producing and in what quantities.
Here’s how to do it…
Hi Zap!,
I’ve just placed an order #12345 on your website and would like to re-order the following designs from a previous order #12121. Please can I have…
10x [YOURNAME]-DESIGN1-CLEARCHARM-12121
20x [YOURNAME]-DESIGN2-WALNUTKEYRING-12121
10x [YOURNAME]-DESIGN3-ACRYLICPIN-12121
Thanks!
[YOUR NAME]
If you have any questions about this tutorial or any other aspects of our website and manufacturing processes, please do not hesitate to get in touch. We’d love to hear from you.